Resources

Guides & Troubleshooting

Step-by-step instructions for setup, testing, problem resolution and best practices. Get the most out of your hardware validation workflow.

10

Guide Topics

CPU/GPU/RAM

Test Coverage

v17

Memory Overhaul

Pro

QA Workflows

Getting Started with OCCT

Follow these steps to install and launch OCCT for your first stability test session.

  1. 1
    Download and verify. Download OCCT from the official download page. Verify the SHA-256 checksum matches the published hash before running the installer.
  2. 2
    Install with administrator privileges. Run the installer as administrator to ensure full sensor access for monitoring features. Check the digital signature in file properties before proceeding.
  3. 3
    Close unnecessary applications. Close background apps, browsers and games before stress testing to ensure accurate results and prevent interference with test workloads.
  4. 4
    Select your test type. Choose CPU, GPU, Memory or Power test from the main interface. Configure duration and monitoring sensors before starting.
  5. 5
    Monitor and review. Watch real-time temperature and voltage graphs during the test. Review the generated report for errors, throttling or instability indicators when complete.
CPU Stress Testing Guide

CPU testing validates processor stability under maximum load. Essential for overclocking validation and pre-delivery QA on custom builds.

  • Test mode: OCCT (recommended for fastest error detection)
  • Data set: Large
  • Thread count: Match physical cores for initial test
  • Duration: 1 hour minimum for overclock validation
  • Enable all temperature and voltage sensors
  • CPU temperature exceeding safe limits (varies by CPU)
  • Frequency throttling below expected boost clocks
  • Voltage drops under load indicating PSU weakness
  • Errors reported in the test log panel
  • System crashes or blue screens during test
OCCT brand mark for stability testing software

Memory Test Configuration

The v17 memory test overhaul introduces presets, import/save functionality and a block system for granular memory validation. Follow each step below with the matching OCCT interface view.

Click any screenshot to open it full size.

Step 01

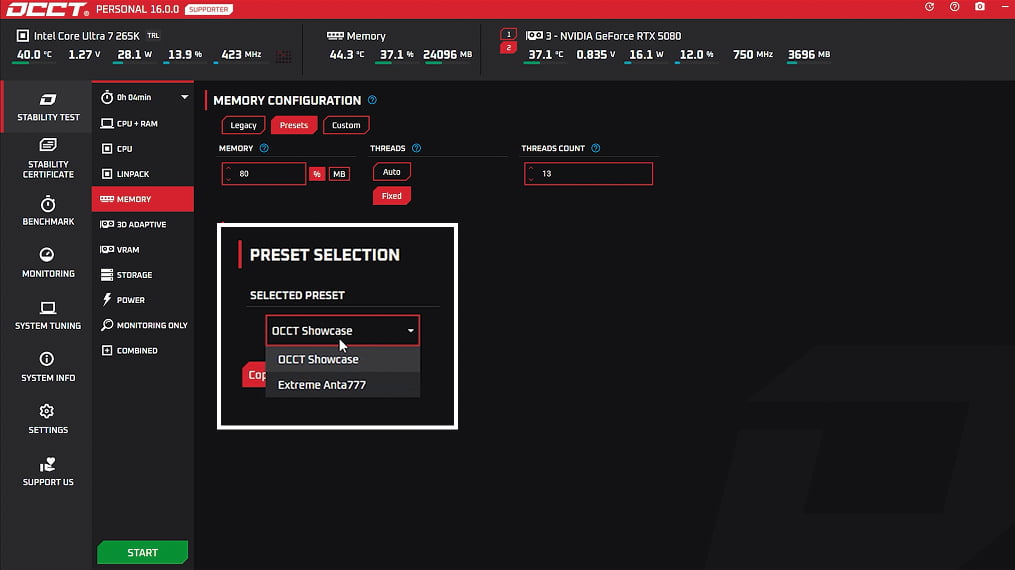
Select a preset or create custom

Open the Memory test, switch to the Presets tab and pick a profile such as OCCT Showcase or Extreme Anta777. Adjust memory coverage and thread count before running.

OCCT — Memory Configuration Presets
OCCT RAM preset gallery highlighting Showcase and Extreme Anta777 profiles
Preset selection — choose a built-in profile or switch to Custom
Step 02

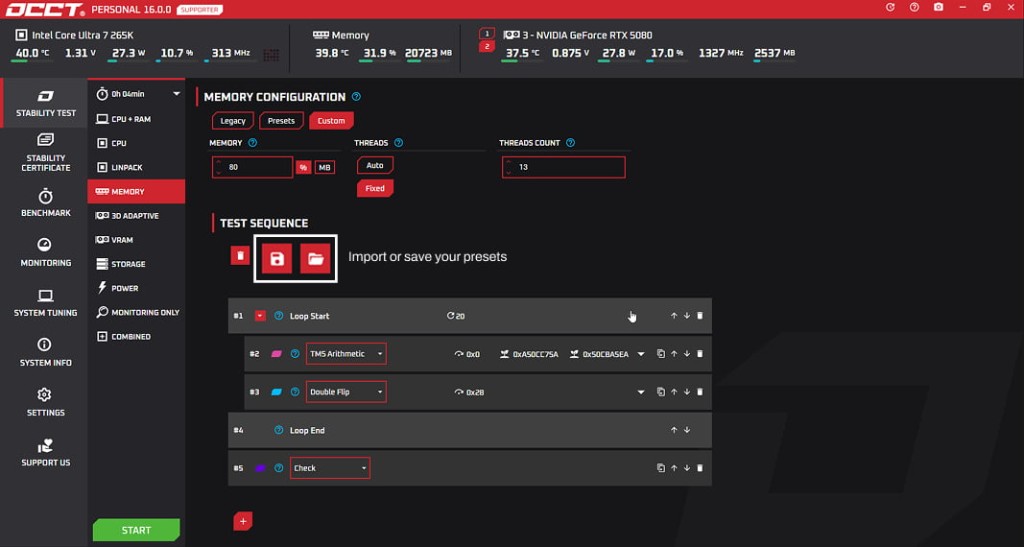
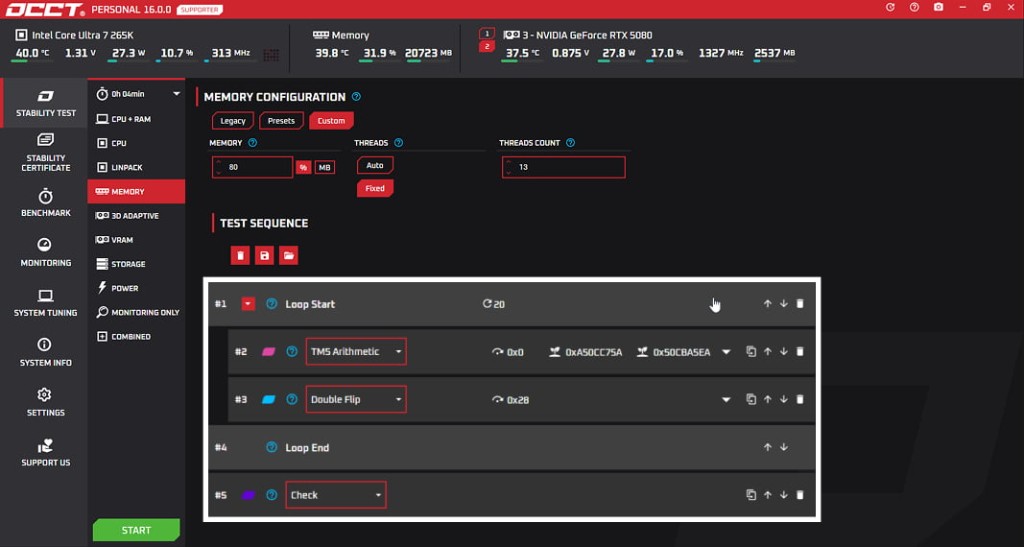
Configure the block system

On the Custom tab, build your test sequence with Loop Start, TM5 Arithmetic, Double Flip and Check blocks. Set cycle counts and fine-tune each step for deep RAM coverage.

OCCT — Test Sequence Blocks
OCCT memory test custom block system with Loop Start, TM5 Arithmetic, Double Flip and Check sequence
Block system — chain memory tests into repeatable loops
Step 03

Save and import profiles

Use the save and load icons above the test sequence to export your configuration or import a preset from another machine. Ideal for build shops and fleet burn-in workflows.

OCCT — Preset Management Import
OCCT memory test import and save preset buttons for exporting and loading test configurations
Import or save — reuse the same profile across systems

Verify XMP / EXPO profiles

Run a memory test before and after enabling XMP or EXPO in BIOS. Compare OCCT reports to confirm your RAM is stable at the rated speed and timings.

Monitoring Setup

OCCT integrates the Hwinfo engine for accurate sensor readouts. Proper monitoring setup ensures you catch thermal and electrical issues during stress tests.

Enable all relevant sensors before starting any test. At minimum, enable CPU temperature (per-core), CPU package power, GPU temperature, GPU power, motherboard VRM temperatures and fan speeds.

Set temperature alerts. Configure intelligent alerts to notify you when components approach thermal limits. This prevents hardware damage during extended stress sessions.

Use graph view. The real-time graph panel correlates test load with sensor readings, making it easy to spot throttling events that coincide with temperature spikes or voltage drops.

Run as administrator. On Windows, administrator privileges unlock additional sensor data from motherboard EC and GPU drivers that are unavailable in standard user mode.

GPU and 3D Testing Guide

OCCT's 3D adaptive testing dynamically adjusts GPU load to replicate real gaming conditions. Use this for GPU overclock validation and artifact detection.

  1. 1. Select 3D test mode and choose adaptive testing for realistic load patterns
  2. 2. Enable GPU temperature, hotspot, memory junction and power sensors
  3. 3. Run for at least 30 minutes to detect thermal throttling under sustained load
  4. 4. For multi-GPU setups, use parallel testing to validate all cards simultaneously
  5. 5. For AI/compute cards without 3D support, switch to GPU Compute (OpenCL) mode

Understanding Test Reports

OCCT generates detailed reports after every test session. Learn to read them effectively and use report comparison for rapid diagnostics.

Error log. Any errors detected during testing appear in the log with timestamps. Even a single error indicates instability and should not be ignored for overclocked systems.

Sensor summary. Review maximum and average values for temperature, voltage and frequency. Compare against expected specifications for your hardware.

Report comparison. Load two reports side by side to quickly spot differences. Ideal for before/after overclock comparisons or diagnosing BIOS setting changes.

Certificates. Generate a stability certificate after a successful test battery. Certificates are shareable and serve as professional proof of system validation.

Antivirus Warnings Explained

If your antivirus flags OCCT during download or execution, follow this guide before taking action. OCCT is legitimate software, not malware.

  1. 1
    Confirm download source. Ensure you downloaded from the official OCCT.pro download page, not a third-party mirror or repackaged installer.
  2. 2
    Verify SHA-256 checksum. Compare your file hash against the published checksum on the download page. Mismatched hashes indicate a tampered file.
  3. 3
    Check digital signature. Right-click the installer, open Properties, and verify the Digital Signatures tab shows the official publisher certificate.
  4. 4
    Add exclusion if verified. If the file passes checksum and signature verification, add OCCT to your antivirus exclusion list. Stress testing software commonly triggers heuristic false positives.
  5. 5
    Report false positives. If a verified official build is flagged, report it as a false positive to your antivirus vendor to help improve detection accuracy for all users.

Custom Test Setup

Build repeatable test suites for production environments, PC building shops and automated QA workflows.

  • Save presets: Configure your ideal test parameters and save them as named presets for one-click execution on every new system.
  • Test sequences: Run CPU, then GPU, then memory tests in sequence for comprehensive validation before customer delivery.
  • Automated certificates: Generate stability certificates automatically after successful test completion for professional documentation.
  • Linux automation: Deploy identical test configurations across server fleets using saved presets and command-line execution on Linux builds.
OCCT stability certificate example

Common Problems and Solutions

Update GPU drivers to the latest version. Run as administrator. If using an outdated Windows build, install all pending system updates. Reinstall OCCT after verifying your download checksum.

Run OCCT as administrator. Ensure Hwinfo integration is enabled in settings. Some laptop motherboards limit sensor access; try updating chipset drivers and BIOS firmware.

Errors on stock clocks indicate a hardware defect, insufficient cooling, or PSU inadequacy. Check temperatures during the test. Try reducing memory speed or disabling XMP/EXPO to isolate the failing component.

Improve case airflow, reapply thermal paste, verify cooler mounting pressure, or reduce overclock settings. Use monitoring graphs to identify which component is throttling first.

GPU artifacts indicate instability. Reduce GPU overclock, increase power limit if thermals allow, or test at stock settings to determine if the GPU is defective and requires RMA.

Install lm-sensors and configure sensor modules for your hardware. Run OCCT with sudo for full hardware access. Verify GPU drivers and OpenCL runtime are installed for compute tests.

OCCT Testing Best Practices

  • ✓ Always baseline test at stock settings before overclocking
  • ✓ Test one component change at a time for clear cause identification
  • ✓ Run tests for at least 1 hour for reliable overclock validation
  • ✓ Monitor VRM and motherboard temperatures, not just CPU/GPU
  • ✓ Save reports after every test for comparison and documentation
  • ✗ Never ignore a single error during stress testing
  • ✗ Do not stress test on inadequate cooling or airflow
  • ✗ Avoid changing multiple BIOS settings between test runs
  • ✗ Do not download from unofficial or unverified sources
  • ✗ Never skip checksum verification on new downloads

Related OCCT Resources

Download the latest build, explore all features, or browse frequently asked questions.

Download